Here’s a quick guide on how to cancel your Taskade subscription. Whether you’re switching to another productivity tool or simply cutting costs, this guide will walk you through the cancellation steps with ease. Taskade offers collaborative productivity solutions, but if you’re looking for alternatives, you might want to explore other AI tools that could better suit your needs. This guide will ensure a smooth cancellation process.
How to Cancel a Taskade Subscription
Canceling your Taskade subscription is straightforward when you follow the correct steps. Whether you’re moving to another platform or reducing your expenses, follow this guide for a hassle-free cancellation process.
How to Cancel Taskade: Step-by-step
Step 1: Visit the Taskade Website
To begin, visit the Taskade website. Once there, navigate to the appropriate section where subscription management is handled. This might be found in Account Settings or under a specific Subscription tab.
Step 2: Log into Your Taskade Account
If you haven’t already logged in, use your credentials to access your account dashboard. If you’ve forgotten your password, you can use the Forgot Password option to reset it.
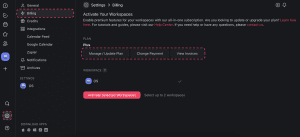
Step 3: Access Subscription Settings
Once logged in, locate the section related to your subscriptions, which may be labeled as Subscription Management or Billing. Click on this section to proceed.
Step 4: Review Your Subscription Details
Before proceeding with the cancellation, take a moment to review the details of your subscription, such as the type of plan, associated benefits, and billing cycle. This will help you understand what features or services you may lose access to after canceling.
Step 5: Initiate the Cancellation Process
Within the subscription settings, look for an option to cancel your subscription. This may be a button labeled Cancel Subscription or something similar. Click on it to begin the cancellation process.
Step 6: Provide Feedback (Optional)
Taskade may ask for feedback on why you’re canceling. While providing feedback is optional, it can help them improve their services. Feel free to share your thoughts if prompted.
Step 7: Confirm the Cancellation
After initiating the cancellation, you’ll likely be asked to confirm your decision. This is your final opportunity to reconsider before the cancellation takes effect. Confirm your decision to proceed.
Step 8: Verify Your Cancellation
Once you’ve completed the cancellation process, check for a confirmation message or email from Taskade. This will serve as proof that your subscription has been successfully canceled and will not renew in the future.
Additional Resources
Taskade Homepage: Explore more about Taskade and their productivity platform.
Taskade Help Center: For detailed instructions on managing your Taskade subscription.
Taskade Contact Us: If you encounter any difficulties or have questions about the cancellation process, reach out to the Taskade support team for assistance.
Conclusion
Canceling your Taskade subscription is a simple process when you follow these steps. By reviewing your subscription details, initiating the cancellation, and confirming it, you can ensure a smooth transition. If you have any further questions or concerns, don’t hesitate to reach out to Taskade’s support team for help.
For more detailed information or specific assistance with your Taskade account, you can also visit their FAQ page or contact their support team directly.
For deals on other subscription services, visit Subscribed Deals to explore offers that can help you save.
Looking for Alternatives?
If you’re exploring other tools after canceling your Taskade subscription, here are some excellent alternatives for AI-driven productivity, communication, and creative design:
Claude AI: A sophisticated AI platform designed to assist with various tasks, offering personalized responses and workflow enhancements.
Chatwith.io: A powerful chatbot platform that enables businesses to automate customer interactions and improve engagement.
Taplio: An AI-driven tool for boosting your LinkedIn presence, helping you optimize your social media strategy and engagement.
ChatGPT: A versatile AI that supports writing, brainstorming, and automating tasks across a wide range of industries.
Pika Art: A creative platform designed for producing high-quality digital art, perfect for designers and visual content creators.
These platforms provide a range of features to support your productivity, communication, and creative needs.