


How much can customers reduce their spend with Nullify?
Up to 100%

Nullify revolutionizes application security, integrating AI agents to automate tasks, enhance developer collaboration, and provide real-time insights. A comprehensive, all-in-one solution with instant integration and flexible compatibility, Nullify simplifies secure development. Join the waitlist for a proactive approach to AppSec.
Nullify.AI uses AI to help developers find and fix security vulnerabilities. It discusses how Nullify integrates with existing developer workflows. Some of the important points are that Nullify can be set up quickly and easily, and that it helps developers to find and fix vulnerabilities without slowing down the development process.
i – Tricks are what we like to call direct ways to reduce your subscription costs.
You can use Nullify’s Open Source Version
Refer to GitHub’s documentation on creating a GitHub App for general guidance on setting up your application. Configure your application with the following details:
Identifying and authorizing users:
Webhook:
Display Information:
Grant access to the following Repository permissions:
| Permission | Access | Explanation |
| Checks | Read & write | Write required to create and modify Check Runs |
| Contents | Read & write | Write required for creating and resolving comments |
| Issues | Read & write | Write required to create and modify Issues |
| GitHub.com: Metadata | Read-only | This setting is automatically set by GitHub |
| Pull Requests | Read & write | Write required to create and modify Pull Requests |
Grant access to the following Organization permissions:
| Permission | Access | Explanation |
| Members | Read | Read teams |
If Repository Administration permissions are not provided, please ensure that you enable GitHub Issues within each repository that Nullify is installed
Also, subscribe to the following Events:
| Event Type | Subscription |
| Pull Request | Required |
| Push | Required |
| Check Run | Required |
| Issues | Required |
| Issue Comment | Required |
| Pull Request Review | Required |
| Pull Request Review Comment | Required |
| Pull Request Review Thread | Required |
In the “Where can this GitHub App be installed?” section, select Only on this account. Then select Create GitHub App.

Navigate to Optional features and opt-out of the user-to-server token expiration feature
Now, you must install your GitHub App in your organization and retrieve the App ID, client secret and private key. For further details, consult GitHub’s documentation on installing GitHub Apps.
Navigate to the Developer settings of your new App. In General, get the App ID and Client ID:

In General, generate a new Client secret.
In General, generate a private key:

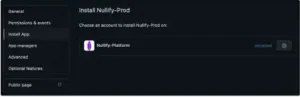
In Install App, install the App in your organization:
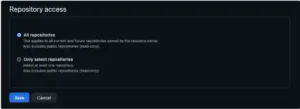
In Repository access, select the repositories you would like to install Nullify:

Let Subscribed do it for you - get clear insights, have the best prices, and never miss a renewal again!
Get Started Now